
Core Reasons to Harden SSH
Prevent Brute-Force Attacks: Attackers use automated scripts and bots to try millions of common username and password combinations. Default SSH settings typically allow these persistent attempts, making it easier for hackers to eventually guess credentials.
Reduce the Attack Surface: Hardening involves disabling unnecessary features (like X11 forwarding or SFTP subsystems) and restricting access to specific users or IP addresses. This limits the "surface" available for an attacker to exploit.
Block Unauthorized Administrative Access: By default, many systems allow direct root login. Hardening disables this to force attackers to guess both a unique username and a password/key, preventing them from immediately gaining full system control.
Mitigate "Zero-Day" Vulnerabilities: While the OpenSSH software is generally secure, adding layers like Fail2Ban or TCP Wrappers can protect the system even if a new, unknown vulnerability in the SSH service itself is discovered.
Ensure Business Continuity and Trust: A compromised SSH connection can be used as a launchpad for malware or to steal sensitive data, leading to costly downtime, loss of customer trust, and regulatory non-compliance.
Key Hardening Techniques
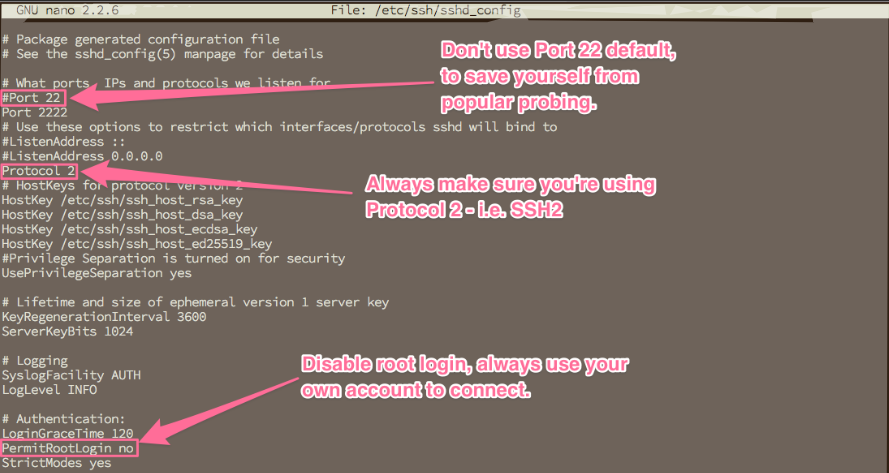
Most hardening is done by editing the sshd_config file (usually at /etc/ssh/sshd_config):
Technique
Security Benefit;
Disable Password Auth: Forces use of SSH Keys, which are virtually impossible to brute-force compared to passwords.
Disable Root Login: Prevents hackers from targeting the most powerful account directly.
Change Default Port: Moving from port 22 to a non-standard port (e.g., 2222) stops most automated "noise" and basic bot scans.
Enable MFA: Adding Two-Factor Authentication (like Google Authenticator) ensures that even a stolen key or password isn't enough to gain entry.
Restrict Users/IPs: An allowlist ensures only specific people from trusted networks can even attempt to log in.
SSH (Secure Shell) is the primary method to connect, manage, and troubleshoot Ubuntu VPS servers remotely. Because it provides administrative control, securing SSH is critical to protecting your server from unauthorized access and attacks. The default settings of SSH prioritize accessibility, not security. Attackers often target these defaults through automated tools and brute force attacks. This guide will walk you through advanced, step-by-step SSH hardening on Ubuntu VPS for maximum protection, including detailed explanations of each security improvement.
The Risks of Default SSH Settings
With out-of-the-box settings, SSH is straightforward but exposes several security weaknesses:
Anyone can scan for open port 22 and attempt frequent logins using common usernames and passwords.
Direct root access simplifies an attacker’s job—if the root password is guessed, they gain full control immediately.
Password-based logins are susceptible to brute force attacks where millions of potential passwords are attempted by bots.
Allowing all users to attempt logins widens the attack surface if weak or unused accounts exist.
No protection against repeated failures allows relentless attackers to keep trying indefinitely.
Hardening your SSH means progressively shutting down these attack pathways while ensuring you stay in control of your VPS.
Complete Guide to Hardening SSH on Ubuntu VPS
Change the Default SSH Port
Moving SSH away from well-known port 22 is a basic but effective step. While it won’t stop determined attackers, it helps avoid widespread automated attacks targeting the default port.
Step 1: Open the SSH configuration file with your preferred text editor:
sudo nano /etc/ssh/sshd_config
Step 2: Locate the line #Port 22. Remove the # and change 22 to an unused port above 1024 (for example, 2222): Port 2222
Choose a port number not used by other services, but avoid ports below 1024 as they require root to bind.
Step 3: Save and exit the editor.
Step 4: If you use UFW as your firewall, permit the new port: sudo ufw allow 2222/tcp
Step 5: Restart the SSH service: sudo systemctl restart sshd
When connecting next time, specify the new port, for example: ssh -p 2222 user@your-server-ip
Important: Test a new SSH session on the new port before disconnecting your existing session to avoid locking yourself out!
Disable SSH Protocol 1
Protocol 1 is outdated and insecure. Ensure only SSH Protocol 2 can be used.
Step 1: In /etc/ssh/sshd_config, add or edit:
Protocol 2
Step 2: Save, exit, and restart SSH.
Disable Direct Root Login
Direct root login poses a huge risk. Force all users to log in as a regular account and use sudo for administrative privileges as needed.
Step 1: Edit the SSH configuration: sudo nano /etc/ssh/sshd_config
Step 2: Find or add the line: PermitRootLogin no
Other useful options include PermitRootLogin prohibit-password (blocks password logins but allows public key logins for root) or PermitRootLogin without-password on older Ubuntu versions.
Step 3: Save, close, and restart SSH.
Warning: Before disabling root, ensure your non-root user is in the sudo group. You can check and add them with:
sudo usermod -aG sudo yourusername
Enforce SSH Key Authentication and Disable Passwords
Password-based logins are inherently weak. SSH keys use public key cryptography and are nearly impossible to brute force. After keys are set up, you can disable passwords for all users.
Step 1: On your local machine, generate an SSH keypair. For extra security, use the ed25519 algorithm, or rsa -b 4096 for compatibility:
ssh-keygen -t ed25519 -C "your_email@example.com"
Step 2: Upload your public key:
ssh-copy-id -i ~/.ssh/id_ed25519.pub -p 2222 youruser@your.server.ip
If ssh-copy-id isn’t available, manually append your ~/.ssh/id_ed25519.pub contents to ~/.ssh/authorized_keys on the server.
Step 3: Edit /etc/ssh/sshd_config to enforce keys and disable passwords:
PubkeyAuthentication yes PasswordAuthentication no ChallengeResponseAuthentication no UsePAM yes
Step 4: Save, restart SSH, and test key login.
Important: Always ensure your private key is protected by a strong passphrase. Do NOT share it. Backup keys securely and never store on internet-facing devices or in email.
Limit SSH Access to Specific Users and Groups
By default, any user account can try to log in via SSH. Restrict logins to only necessary users or groups.
Step 1: To allow only specific users:
AllowUsers adminuser developer
Or, to permit only a group (add users to “sshusers” group):
AllowGroups sshusers
Step 2: Save and restart SSH.
Use Two-Factor Authentication (2FA/MFA)
Adding a one-time code (such as from Google Authenticator) makes stolen keys or passwords useless by themselves.
Step 1: Install the needed module:
sudo apt install libpam-google-authenticator
Step 2: For each user, run:
google-authenticator
This will provide a QR code to scan with your authentication app and offer backup codes. Answer prompts to secure the setup.
Step 3: Configure PAM to require the authenticator. Edit /etc/pam.d/sshd and add AT THE TOP:
auth required pam_google_authenticator.so
Step 4: In /etc/ssh/sshd_config, set:
ChallengeResponseAuthentication yes AuthenticationMethods publickey,keyboard-interactive
This means both a valid SSH key and the one-time code are needed to connect.
Step 5: Save, restart SSH, and test with your authenticator app and private key.
Restrict SSH by IP Address with a Firewall
Allowing SSH only from fixed/trusted IP addresses prevents most attackers from even seeing your SSH service.
Step 1: Allow SSH from your IP (replace 203.0.113.4 and 2222 respectively):
sudo ufw allow from 203.0.113.4 to any port 2222 proto tcp
Step 2: If you have a dynamic home IP, consider using a secure VPN and only allow that IP or VPN subnet through UFW.
Step 3: Deny general SSH access by ensuring the more general rule sudo ufw allow 22/tcp is removed.
Step 4: Enable UFW if not already enabled:
sudo ufw enable
Step 5: To check active rules:
sudo ufw status numbered
This setup ensures that only devices from trusted networks or locations can attempt to access your server through SSH. For users with dynamic IPs, consider using a VPN or a jump server with a static IP as your entry point.
Enforce Additional SSH Hardening Settings
Disable Empty Passwords: Edit /etc/ssh/sshd_config and set:
PermitEmptyPasswords no
Change the Login Grace Time: This limits the time a user has to log in (for example, 30 seconds):
LoginGraceTime 30
Limit Simultaneous Connections: Prevent flooding with too many attempts by setting:
MaxAuthTries 3 MaxSessions 2
Monitor and Audit SSH Access
Regularly check your server’s authentication logs for suspicious access attempts or unauthorized logins.
Step 1: View the log:
sudo cat /var/log/auth.log | grep sshd
Step 2: For live monitoring:
sudo tail -f /var/log/auth.log
Look for patterns like repeated failed logins, new unknown users, or logins from unfamiliar IP addresses.
Keep SSH and System Software Updated
New vulnerabilities are found regularly. Ensuring your SSH server and system packages are up to date is crucial for security.
Step 1: To manually update packages:
sudo apt update && sudo apt upgrade
Step 2: Consider enabling automatic security updates:
sudo apt install unattended-upgrades sudo dpkg-reconfigure --priority=low unattended-upgrades
Backup Your Configuration
Before making significant changes in /etc/ssh/sshd_config, always make backups so you can easily restore if something goes wrong:
sudo cp /etc/ssh/sshd_config /etc/ssh/sshd_config.backup
Conclusion
Hardening SSH on your Ubuntu VPS is essential for system security and peace of mind. Start by changing the default port, disabling root login, and enforcing SSH key authentication. Layer your defenses by restricting user access, applying two-factor authentication, and using firewall rules to limit exposure. Set up Fail2Ban to automatically ban suspicious sources and keep a close eye on your logs for any abnormal activity. Always keep your server updated, back up your config files before changes, and retain a backup SSH session when changing critical settings to avoid lockouts. With thorough SSH hardening, your Ubuntu VPS will be well-defended against both automated and manual intrusion attempts.
C.M

